how to make folders iPhone?Organizing your files and documents is important in keeping your iPhone organized and easy to navigate. One way to do this is by creating folders. Folders allow you to group similar apps and documents together in one place, making it easier to access and find what you need.
how to make folders iPhone: Here’s a step-by-step guide on how to make folders on your iPhone:
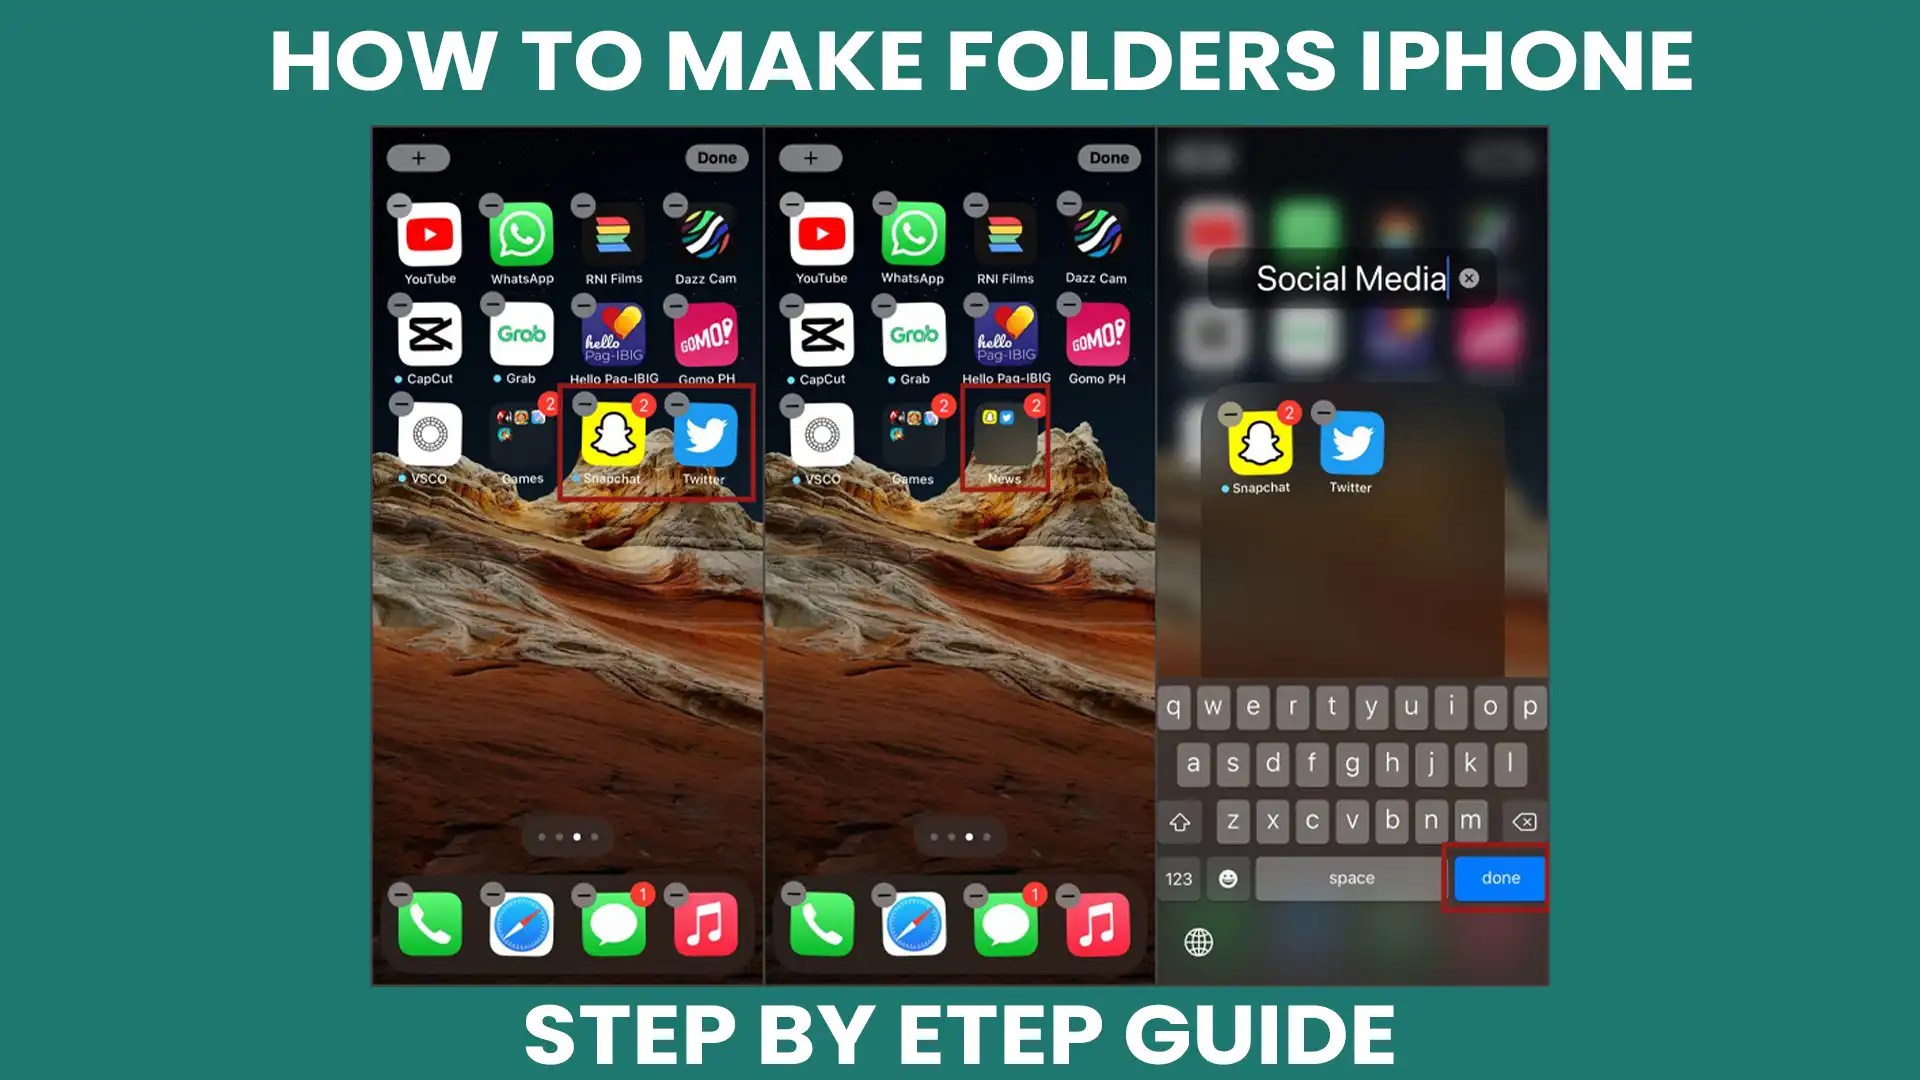
- Unlock your iPhone and go to the Home screen.
- Choose the app you want to create a folder for and hold your finger down on the app icon. You’ll notice that all of the app icons on the Home screen will start to jiggle.
- While still holding your finger down on the app icon, drag it over to another app you want to group together. When you do this, a small square will appear around the two app icons.
- Release your finger from the app icon and it will drop into the square, creating a folder.
- Your iPhone will automatically name the folder based on the type of apps you grouped together. However, you can change the name by tapping on the text field under the folder and entering a new name.
- To add more apps to the folder, simply drag and drop them into the folder.
- To remove an app from the folder, open the folder and hold your finger down on the app icon. Then, drag it out of the folder and onto the Home screen.
How to make folders iPhone with Tips for organizing your folders:
- Group similar apps together. For example, create a folder for all your social media apps, one for your productivity apps, and one for your entertainment apps.
- Keep your most frequently used apps on the Home screen and create folders for the rest.
- Use descriptive names for your folders so you can easily find what you need. For example, instead of “Folder 1,” name it “Social Media.”
- You can create nested folders by dragging a folder onto another folder. This is useful if you have a lot of apps to organize.
how to make folders iPhone, you can keep your apps and documents organized and easily accessible. With these simple steps, you can make your iPhone a more efficient and personalized device.
how to make folders iPhone in folders?
Yes, you can create folders within folders on an iPhone. This feature is called nested folders. To create a nested folder, follow these steps to know how to make folders iPhone:
- Tap and hold an app icon on the Home screen until it starts to jiggle.
- Drag the app icon on top of another app to create a new folder.
- Drag and drop more apps into the new folder to group them together.
- Tap and hold the new folder to open it.
- Tap and hold an app icon in the new folder until it starts to jiggle.
- Drag the app icon on top of another app to create a nested folder.
- Repeat this process to create more nested folders within the new folder.
Note that you can only create a nested folder by using the drag-and-drop method described above. You can’t create a nested folder by simply tapping and holding a folder icon.
Nested folders can help you organize your apps and documents even further by creating subcategories within broader categories. For example, you can create a folder for social media apps, and then create nested folders within that folder for specific social media platforms like Facebook, Twitter, and Instagram. This can make it even easier to find the app or document you need.
(how to make folders iPhone)Is there a file folder on iPhone?
Yes, there is a file folder on the iPhone called “Files.” The Files app is a built-in app on iPhones that allows you to access and manage your files and documents in one place.
With the Files app, you can access files stored on your iPhone, iCloud Drive, and other cloud storage services such as Dropbox, Google Drive, and OneDrive. You can also create folders and organize your files and documents to make them easier to find.
To access the Files app on your iPhone, follow these steps and know how to make folders iPhone:
- From your Home screen, tap the Files app icon. It looks like a blue folder with a white document inside.
- Once you’re in the Files app, you’ll see different locations on the left-hand side, such as iCloud Drive and On My iPhone. You can tap on any of these locations to access your files.
- To create a new folder, tap and hold on an empty space within the Files app, then tap “New Folder.” You can name the folder and then add files or documents to it.
- To add files to a folder, tap and hold on the file you want to move, then drag it into the folder you want it to be in.
The Files app is a convenient tool for managing and organizing your files on your iPhone. It allows you to easily access and manage your files and documents, making it a useful tool for both personal and professional use.

how to make folders iPhone for photos on my iPhone?
Creating a folder for photos on your iPhone can help you organize your photos and make them easier to find. Here’s how you can create a folder for photos on your iPhone:
- Open the Photos app on your iPhone.
- Tap “Select” in the top right corner of the screen.
- Select the photos you want to add to the folder by tapping on them. You’ll see a blue checkmark appear on the selected photos.
- Tap the “Share” icon in the bottom left corner of the screen. It looks like a square with an upward arrow.
- Scroll down on the Share menu and tap “Add to Album.”
- Tap “New Album” and give your new album a name.
- Tap “Save” in the top right corner of the screen to save the new album.
Your new album/folder will now appear in the Albums tab of the Photos app, along with any other albums you’ve created. You can add more photos to the album by selecting them and tapping the “Add to Album” button again, then select the album you want to add them to.
Organizing your photos into folders or albums can help you quickly find the photos you want to view or share. By following these simple steps, you can easily create a folder for your photos on your iPhone.

(how to make folders iPhone)Can you make subfolders in iPhone photos?
Unfortunately, it is not possible to create subfolders within photo albums on an iPhone. While you can create albums within the Photos app, you cannot create subfolders within those albums.
However, there is a workaround that you can use to create a similar organizational system for your photos. You can create a separate album for each category of photos, and then use a naming convention to indicate subcategories within each album. For example, you could create an album called “Travel” and then use subcategories like “Europe,” “Asia,” and “North America” by including the subcategory name in the album title (e.g., “Travel – Europe”).
Alternatively, you can use third-party photo management apps that offer more advanced organization features. These apps allow you to create nested folders or subfolders within photo albums, giving you more control over the organization of your photos.
Overall, while the Photos app on iPhone does not allow for subfolders within albums, there are other ways to create a similar system for organizing your photos.
(how to make folders iPhone)Does iPhone have a secret folder for photos?
Yes, the iPhone has a hidden photo album called “Hidden” that allows you to keep certain photos out of your main photo library. The Hidden album is not visible by default and is designed to help you keep certain photos private or separate from your main photo library.
To access the Hidden album, follow these steps to know how to make folders iPhone:
- Open the Photos app on your iPhone.
- Go to the Albums tab at the bottom of the screen.
- Scroll down to the bottom of the page, and you’ll see a section called “Other Albums.”
- Tap on “Hidden” to access the Hidden album.
Any photos that you have hidden will appear in this album. To hide photos in this album, follow these steps to know how to make folders iPhone
- Open the Photos app on your iPhone.
- Select the photo(s) you want to hide.
- Tap the “Share” icon in the bottom left corner of the screen.
- Scroll down on the Share menu and tap “Hide.”
- Confirm that you want to hide the photo(s).
The hidden photo(s) will be removed from your main photo library and will only be visible in the Hidden album.
It’s important to note that while the Hidden album can help you keep certain photos private or separate, it is not a completely secure way to store sensitive information. Anyone with access to your iPhone can easily find the Hidden album and view the photos stored within it. If you need to keep sensitive information secure, it’s best to use a more secure method such as password-protected apps or encrypted storage.