how to screen record on iPhone
Screen recording on an iPhone can be a very useful tool for a variety of purposes, such as creating instructional videos, capturing gaming sessions, or saving important information for later reference. Fortunately, the process of screen recording on an iPhone is straightforward and can be accomplished with just a few simple steps. In this article, we will explain how to screen record on an iPhone.
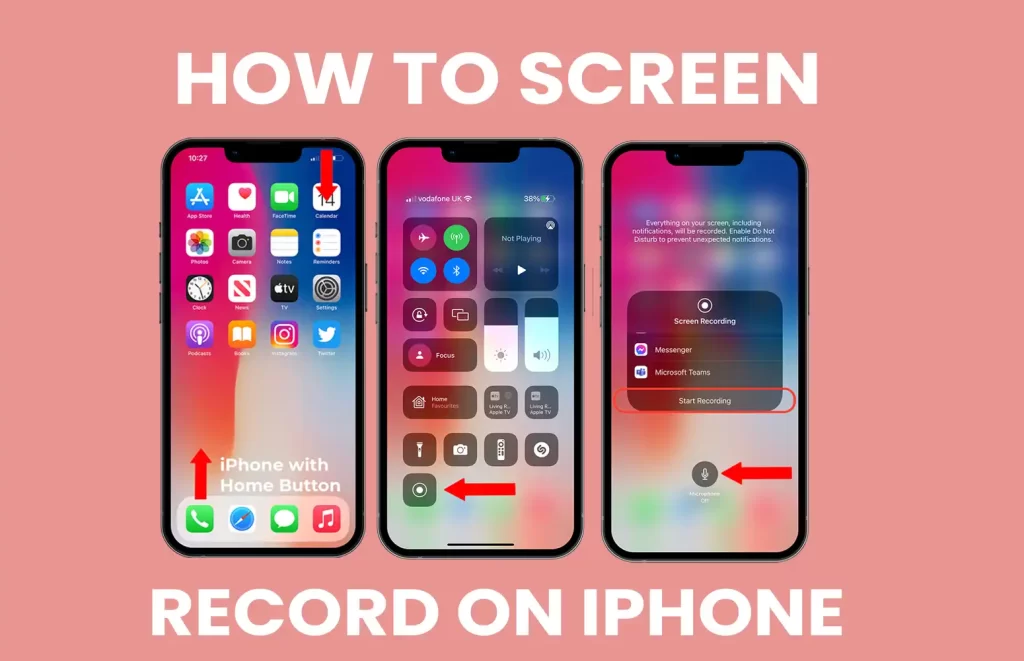
how to screen record on iPhone in the following steps:
- Enable Screen Recording in Control Center
The first step in screen recording on an iPhone is to enable the Screen Recording function in the Control Center. To do this, go to your iPhone’s Settings app, select Control Center, and then tap Customize Controls. Scroll down to find the Screen Recording option and tap the green plus button next to it to add it to your Control Center.
- Open the Control Center (how to screen record on iPhone)
Once you have added the Screen Recording function to your Control Center, you can access it by swiping it down from the top right corner of your iPhone’s screen. On older iPhone models, you can access the Control Center by swiping up from the bottom of the screen.
- Start Recording (how to screen record on iPhone)
In the Control Center, you will see the Screen Recording button, which looks like a circle with a dot inside. Tap this button to start recording your iPhone’s screen. A three-second countdown will appear, giving you time to get ready before the recording starts.
- Stop Recording (how to screen record on iPhone)
To stop the screen recording, tap the red recording icon in the top left corner of your iPhone’s screen. You can also stop the recording by opening the Control Center again and tapping the Screen Recording button.


- Save and Share the Recording
Once you have finished recording, your iPhone will automatically save the video to your Photos app. From there, you can edit the video, trim it, or share it with others through various channels, such as AirDrop, Messages, or email.
In conclusion, screen recording on an iPhone is a convenient and powerful feature that can be used for a wide range of purposes. By following the steps outlined above, you can easily record your iPhone’s screen and create high-quality videos for any purpose.
how to screen record iPhone sound on iPhone?
Yes, you can screen record with sound on an iPhone by following a few simple steps:
- Enable Microphone Access (how to screen record on iPhone)
The first step is to ensure that your iPhone has access to your microphone. To do this, go to your iPhone’s Settings app, select Privacy, and then tap Microphone. Find the app you want to record sound from and make sure it is toggled on.
- Enable Screen Recording (how to screen record on iPhone)
Next, enable the Screen Recording function in the Control Center. To do this, go to your iPhone’s Settings app, select Control Center, and then tap Customize Controls. Scroll down to find the Screen Recording option and tap the green plus button next to it to add it to your Control Center.
- Record with Sound (how to screen record on iPhone)
Once you have enabled the Screen Recording function and microphone access, you can start recording with sound. Open the Control Center by swiping down from the top right corner of your iPhone’s screen. Tap the Screen Recording button, which looks like a circle with a dot inside, and hold it down until the menu appears. From there, turn on the Microphone Audio option by tapping the button.
- Start and Stop Recording
To start recording, tap the Screen Recording button and wait for the three-second countdown. Your iPhone will now start recording both the screen and the sound. To stop recording, tap the red recording icon in the top left corner of your iPhone’s screen.
- Save and Share the Recording
After you have stopped the recording, your iPhone will automatically save the video with sound to your Photos app. From there, you can edit the video, trim it, or share it with others through various channels, such as AirDrop, Messages, or email.
In conclusion, by enabling microphone access and following the steps outlined above, you can easily screen-record sound on an iPhone. This feature can be very useful for creating instructional videos, capturing gaming sessions, or recording important information for later reference.
how to screen record on iPhone with sound and mic?
Recording your iPhone screen with both sound and microphone can be useful for a variety of purposes, such as creating instructional videos, recording gameplay, or documenting important information. Here are the steps on how to screen record on iPhone with sound and mic.
- Enable Microphone Access
To record the sound and microphone of your iPhone screen, you need to enable access to the microphone for the app you are using. To do this, go to Settings > Privacy > Microphone and toggle on the switch next to the app you want to use for recording.
- Enable Screen Recording (how to screen record on iPhone)
Next, you need to enable the Screen Recording function in the Control Center. To do this, go to Settings > Control Center > Customize Controls and add the Screen Recording option to your Control Center.
- Record with Sound and Microphone (how to screen record on iPhone)
Open the Control Center by swiping down from the top-right corner of your iPhone screen. Then, tap the Screen Recording button, which looks like a circle with a dot inside. Hold down the Screen Recording button until the Control Center menu appears. Then, tap the Microphone Audio icon to turn on the microphone audio.
- Start and Stop Recording
Tap the Screen Recording button and wait for the three-second countdown before the recording starts. Your iPhone will start recording the screen and the audio from the microphone. To stop recording, tap the red recording icon in the top-left corner of your iPhone screen.
- Save and Share the Recording
Your iPhone will automatically save the recording to your Photos app. From there, you can edit the video, trim it, or share it with others through various channels, such as AirDrop, Messages, or email.
In conclusion on how to screen record on iPhone
recording your iPhone screen with both sound and microphone is a great way to create engaging and informative videos. By enabling microphone access and following the steps outlined above, you can easily record your iPhone screen with sound and microphone.
how to screen record on iPhone WhatsApp calls on my iPhone?
Recording WhatsApp calls on an iPhone is not officially supported by WhatsApp, and it is also illegal in some jurisdictions without the consent of all parties involved in the call. However, if you still want to record a WhatsApp call on your iPhone, there are a few methods you can try. Here are three possible options:
- Use a Third-Party Screen Recorder
One way to record WhatsApp calls on your iPhone is to use a third-party screen recorder app. There are several screen recorder apps available in the App Store that allow you to record both the audio and video of your iPhone screen. One such app is AZ Screen Recorder, which is free to download and use.
To use a screen recorder app to record a WhatsApp call, first, enable microphone access for the app you are using. Then, start the screen recorder app and follow the prompts to begin recording. Next, start the WhatsApp call and the screen recorder app will capture the audio and video of the call. When the call is finished, stop the screen recorder and the recording will be saved to your device.
- Use a Second Device to Record the Call
Another option is to use a second device, such as another smartphone or a tablet, to record the WhatsApp call. To do this, start the WhatsApp call on one device and use the other device to record the audio of the call using the Voice Memos app or a similar app. After the call is finished, you can transfer the recording to your iPhone and listen to it.
- Use a Physical Recording Device
Finally, you can use a physical recording device, such as a digital voice recorder, to record the audio of the WhatsApp call. This method requires you to place the recorder near the iPhone’s speaker during the call, so it may not produce high-quality audio.
In conclusion, how to screen record on iPhone WhatsApp calls on my iPhone
recording WhatsApp calls on an iPhone is not officially supported by WhatsApp, and it is also illegal in some jurisdictions without the consent of all parties involved in the call. However, if you still want to record a WhatsApp call on your iPhone, you can try using a third-party screen recorder app, a second device to record the call or a physical recording device.